
Plebiscites in CMS 4media are one of the built-in functionalities that will enable you to encourage greater user engagement on your local news website.
You can embed each plebiscite in a dedicated widget, for example, on the homepage of the website. Then, users can see basic information about the ongoing voting and click the "Go to Plebiscite" button to view the plebiscite page and cast their vote.
Learn more about the configuration from our guide: Plebiscite Widget.

How does it work in practice?
A user visits your website and, while scrolling, sees a widget with information about the plebiscite. If they want to learn more, they can click on the "Go to Plebiscite" button and go to the voting subpage.
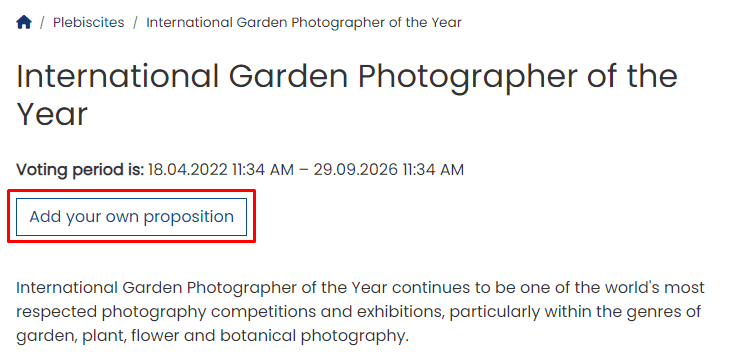
On the plebiscite page, you will find information published (depending on how the website administrator or editor who set up the plebiscite filled in the content):
- plebiscite description,
- duration of the plebiscite (from - to dates),
- voting options - consisting of positions, images, descriptions, and "Yes/No" voting buttons.

Only logged-in users can vote in the plebiscite. However, don't see this as an obstacle but as an opportunity. If you create an interesting plebiscite, you will gain more registered website users. During registration, they will give consent, for example, to marketing activities, allowing you to reach them with collaboration proposals, subscribe them to the newsletter, or add them to Premium article subscribers (hidden behind a paywall), thus increasing the reach of your content!
Adding a Plebiscite
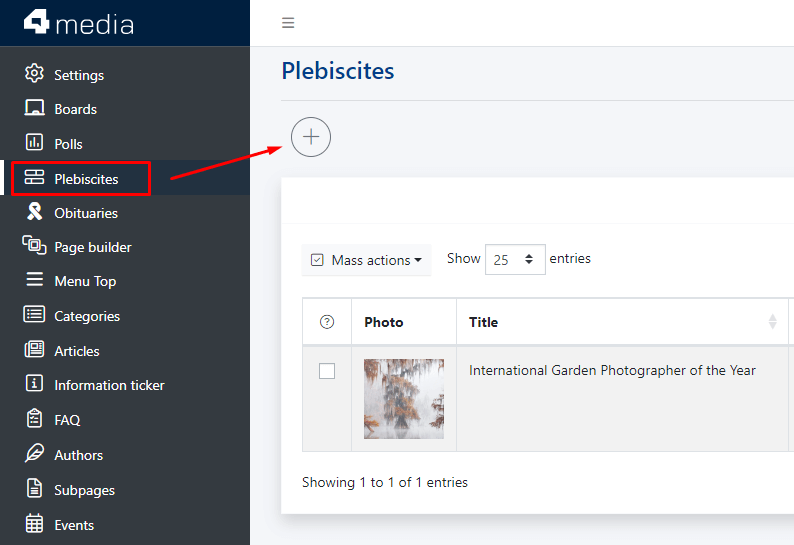
To add your first plebiscite, log in to the CMS 4media admin dashboard. Then, go to the "Plebiscites" module, which is located in the main menu on the left side. You will see a list of plebiscites (it will be empty if no plebiscite has been added previously).
Between the "Plebiscites" header and the table with the list of plebiscites, there is a circular plus button - this is "Add a New Plebiscite." Click on it if you want to go to the plebiscite creator.
Plebiscite Creator and Settings
When you enter the page for adding a new plebiscite, you will see fields for entering the title, description, and settings for the start and end dates. You can also upload a main image, which will be displayed as the plebiscite thumbnail (in the list of plebiscites and in the widget). Additionally, each plebiscite in CMS 4media can have different settings regarding voting and proposals participating in the plebiscite.

1. Voting Frequency - from the dropdown list, you can choose the following options:
- Once an hour
- Once a day
- Once a week
- Once a month
- Once for the plebiscite
2. User May Add Proposals - by selecting "Yes" in the plebiscite settings, users participating in the voting will see a "Add Your Proposal" button.
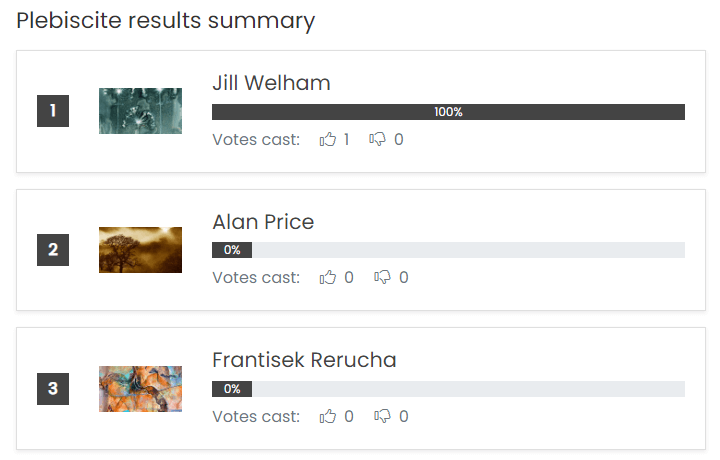
3. Public Summary of the Plebiscite - by selecting "Yes," users will see the results after the plebiscite ends.
4. User Can Add Images to Proposals - by selecting "Yes," users will be able to add images to their proposals.
.png)
5. Ability to Vote on Many Proposals At The Same Time - by selecting "No," users will only be able to vote for one proposal. By selecting "Yes," a field will appear to enter the maximum number of positions a user can vote for.

6. Thumb Voting - voting by "Likes" - you can select "Yes," and then users can vote in the plebiscite by clicking the thumbs-up or thumbs-down buttons. When you choose this option, voting for multiple proposals simultaneously will not be possible.
- Yes

- No

7. Visual Presentation of Proposals - you can choose between a list or tile layout.
- List

- Tiles

Managing the Plebiscite on the Plebiscites List
You can manage plebiscites in the Plebiscites module quickly and conveniently. Added entries are visible in the table with additional information and various options for quick selection or mass actions.

By default, plebiscites are sorted from newest to oldest. The list displays information for each created plebiscite, such as:
- photo,
- title,
- upload date (plebiscite creation date),
- start date (voting start date),
- end date (voting end date),
- views - the number of times the plebiscite subpage has been viewed by users,
- votes - the number of votes cast in the plebiscite,
- propositions - the number of proposals added to the plebiscite that users can vote on,
- status - active (green dot) or inactive (red dot); only active plebiscites can be displayed in the widget and are visible to users.
In the Actions column, there are three options for managing a specific plebiscite and providing additional information.
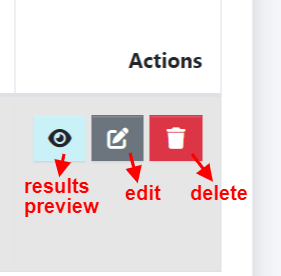
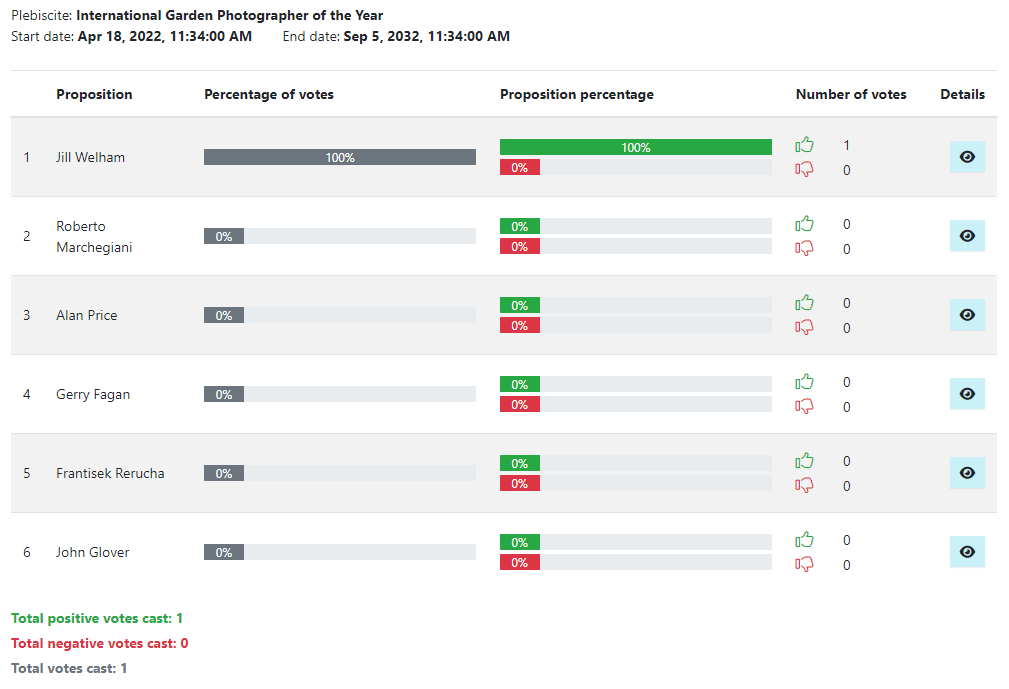
Results Preview - after clicking, the administrator can see a detailed layout of the voting results in the plebiscite.
Edit - allows you to edit the plebiscite settings and change the existing content.
Delete - moves the plebiscite to the trash (it can be restored from there).
Subpage with a list of all plebiscites (Plebiscites hub page)
Plebiscites have their default subpage, just like the classifieds module or business directory - /plebiscites.
The subpage displays all published (and active) plebiscites from the list. It shows the main image of the plebiscite, title, a fragment of the description, start and end date of the plebiscite, and the number of votes.
Users can check which plebiscites are still open for voting and review those that have already concluded.


")
