
Photo galleries in the CMS 4media allow you to easily manage, create, and publish multiple photo reports, event photos, or simply upload multiple images. Thanks to them, you don't have to paste several photos into the article content editor - just one or two will suffice, and you can conveniently add the rest to a separate photo gallery, which you can then assign to display below the article.
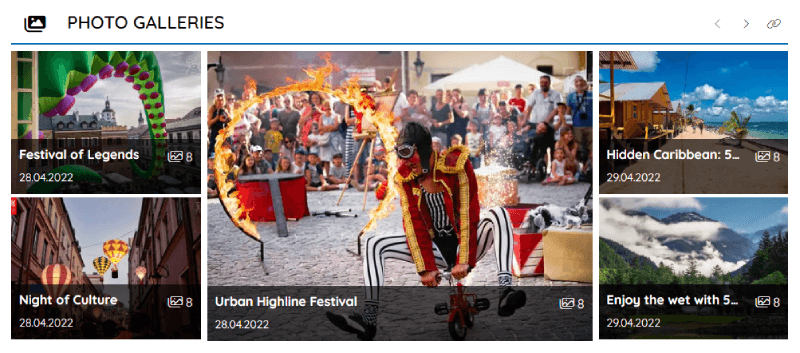
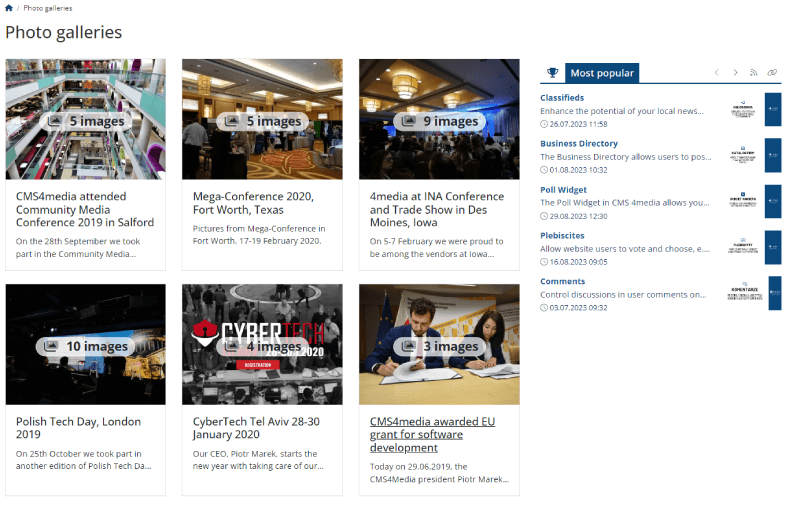
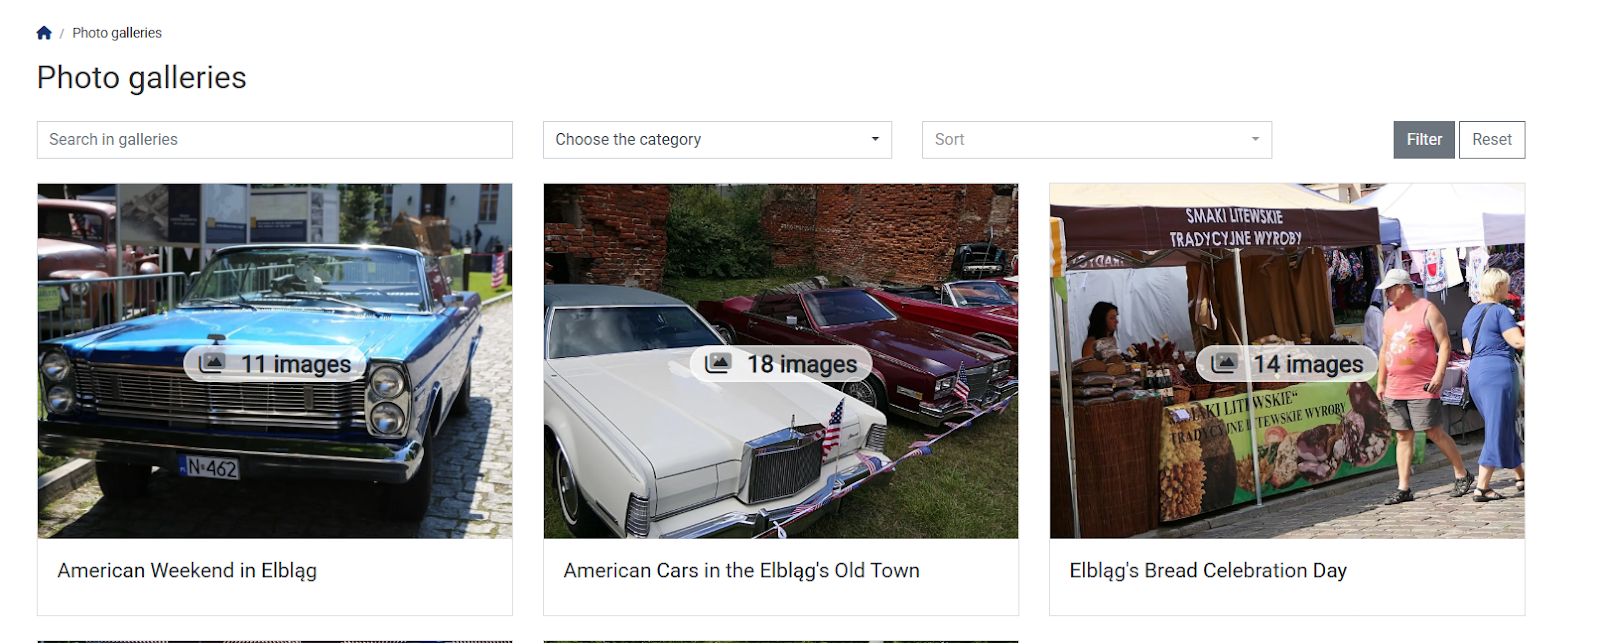
All added photo galleries in the 4media CMS are collected on a dedicated subpage with the address path /photo-galleries, for example, https://demo.4media.com/photo-galleries. You can freely edit the appearance of this subpage and add other widgets in the Page Builder (Page Visualisation) module.
Adding and Setting up Photo Galleries
To add a new photo gallery, log in to the admin panel of your website in the CMS 4media. Then, in the main menu, find the Photo Galleries module. Clicking on it will display a table containing galleries added in the Photo Galleries module.
You can add a new photo gallery by clicking on the plus button in a circle above the table. This will open the gallery creation wizard.
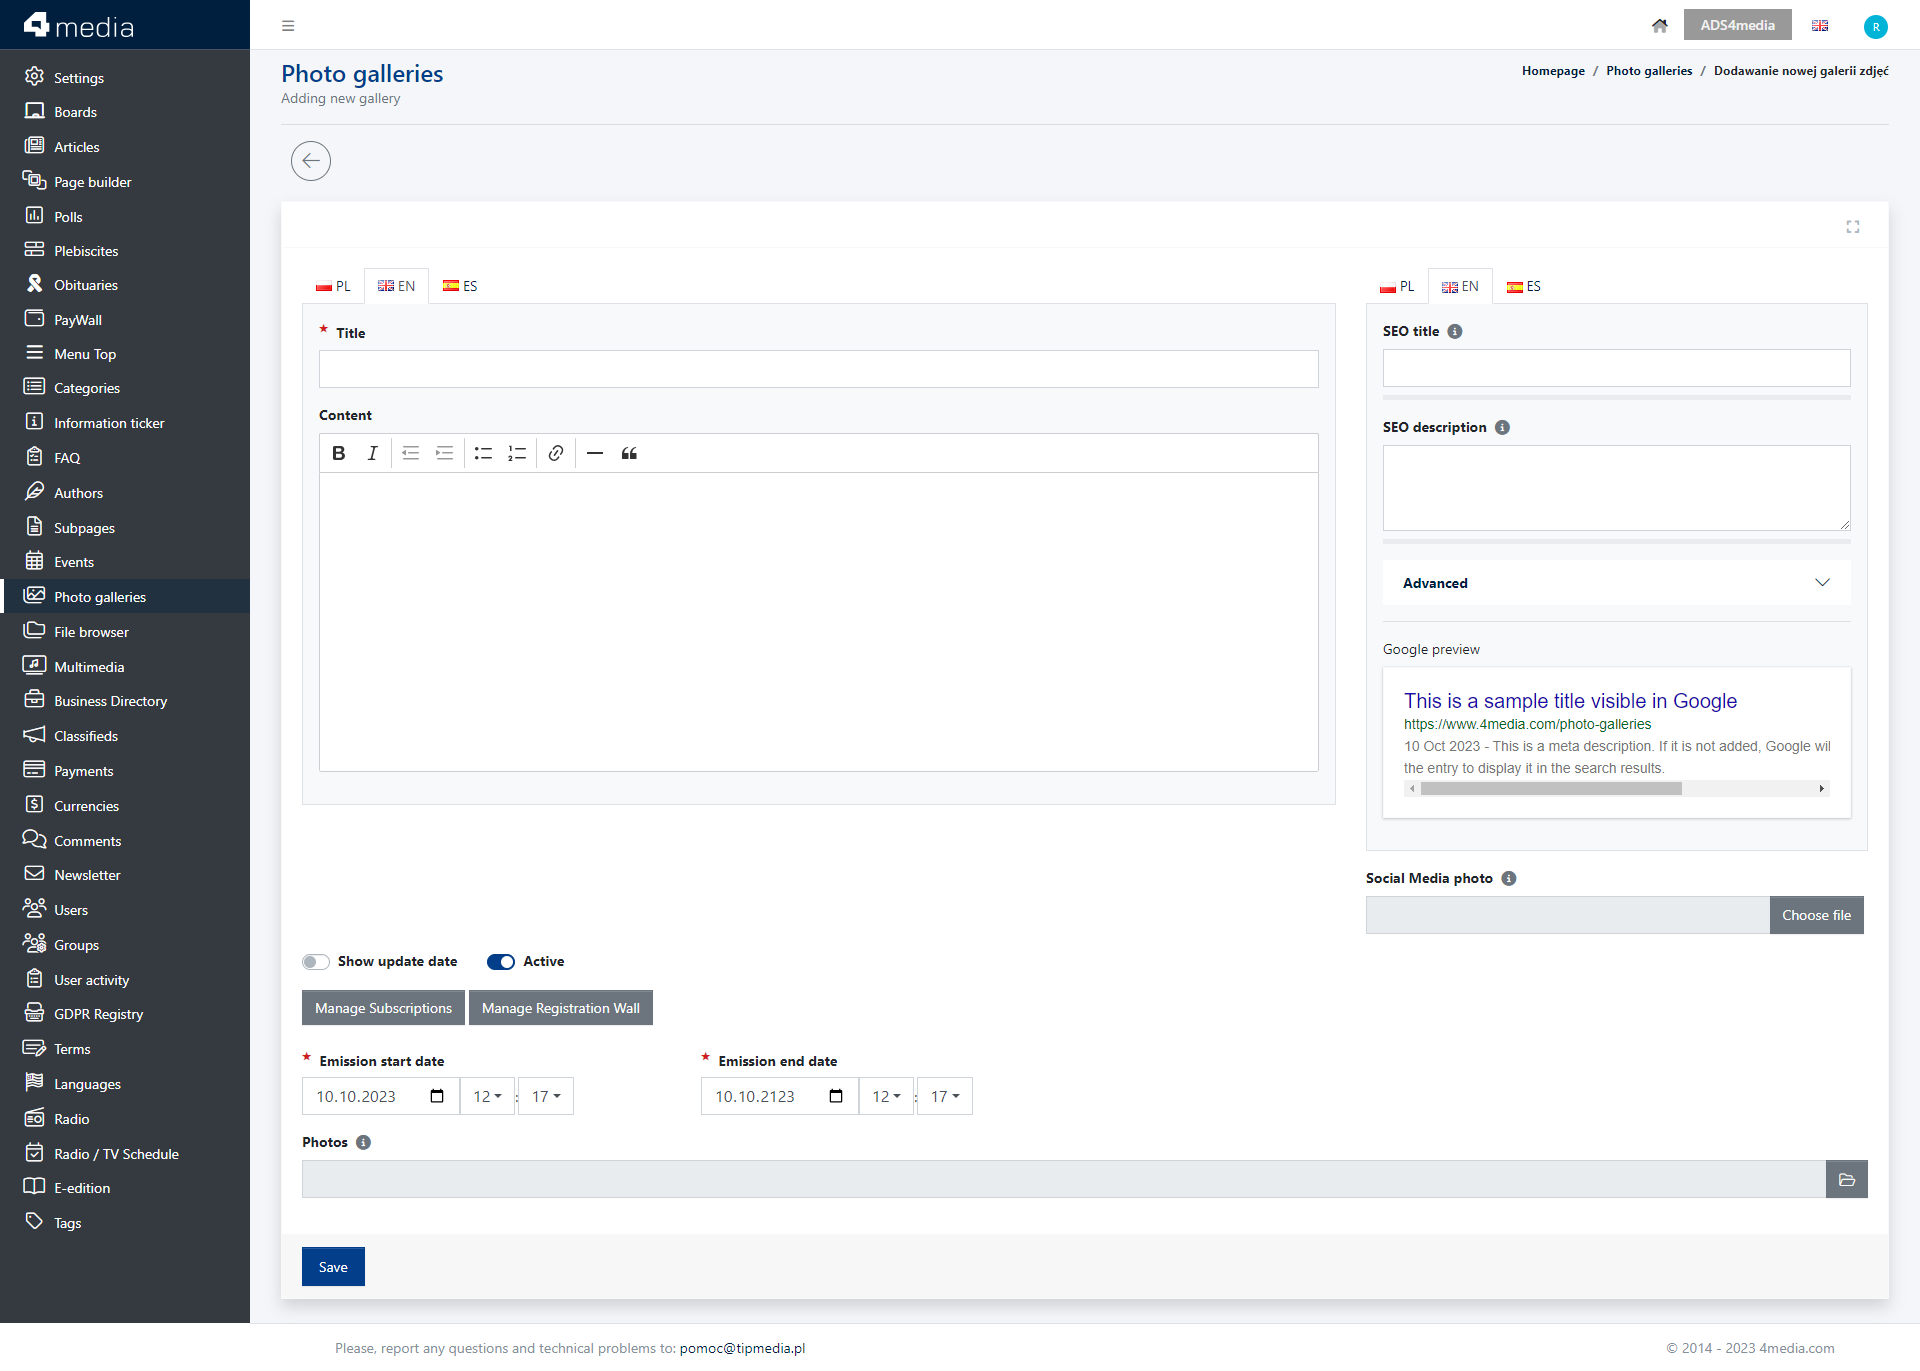
Here you can set:
- Title - the title of the photo gallery; it will also function as a link and will be visible in the gallery's URL.
- Content - a longer description of the gallery. It is displayed on the subpage with other galleries below the thumbnail and title as a text fragment and on the gallery page.
- Tags - here, you can enter several tags (labels, keywords) that will be displayed under the photos. To create a tag set for photo galleries: Go to the Tags → Photo Galleries module and add tags to the system
- Show Update Date - if you activate this switch, the gallery will display its update date (e.g., when you edit the gallery's content or description, etc.).
- Active - toggle the switch to the left to disable gallery display. It will be hidden and will not appear to users on the website. You can activate it at any time and edit its content.
- Manage Paywall / Registration Wall - options for managing Paywall plans. Here, you can add or exclude the photo gallery from one of the existing Paywall plans.
- Emission start date - the publication date on the website.
- Emission end date - the date indicating the end of the photo gallery's publication on the website. After this date, the gallery becomes "Inactive."
- Photos - here, you can upload photos from your device's storage - JPG or PNG files. The maximum file size (for a single photo) should not exceed 10MB. The minimum photo dimensions are 540 x 540 px.
After uploading the photos, they will appear at the bottom in the "Uploaded Photos" section.
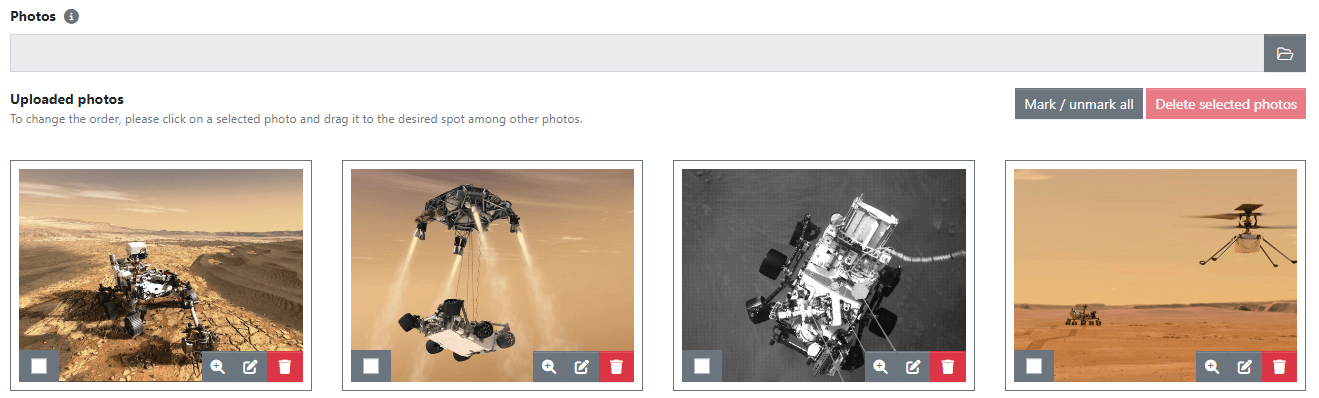
You can rearrange the photos (simply drag them to change their display order), delete them, and edit their data.
Editing the photo data allows you to add a title, a brief description, and alternative text for the photo.
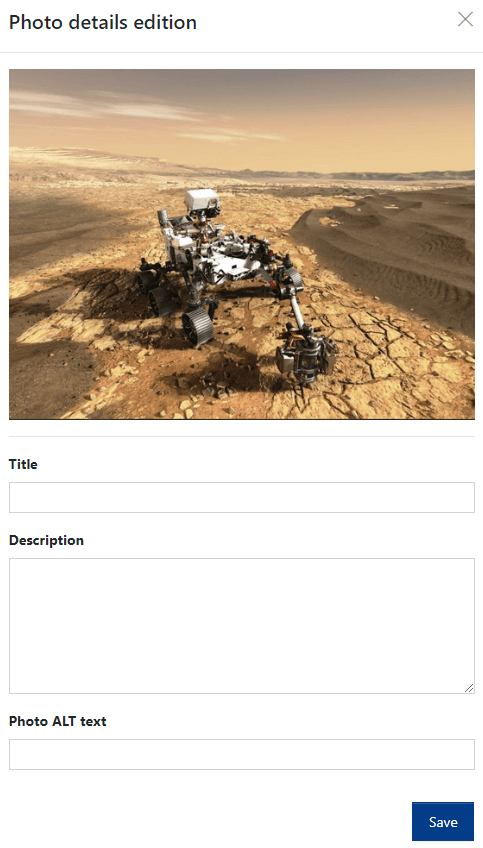
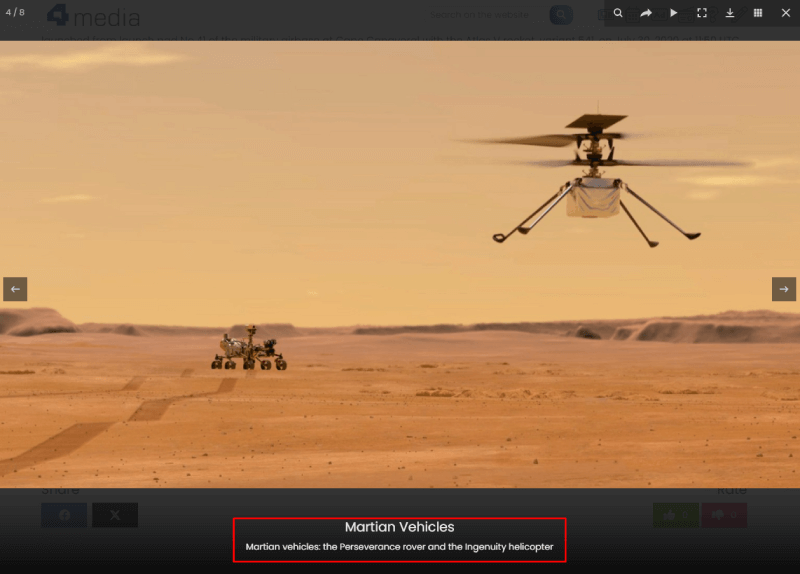
If you add a title and description to a photo, they will be displayed under the photo when browsing the gallery.
Managing Galleries in the Photo Gallery Module
Each individual photo gallery functions as a separate subpage of the website. You can find all galleries after logging in to the admin panel in the Photo Galleries module. As a website administrator, you can edit the content of each gallery separately or perform other actions using Mass Actions, for example.
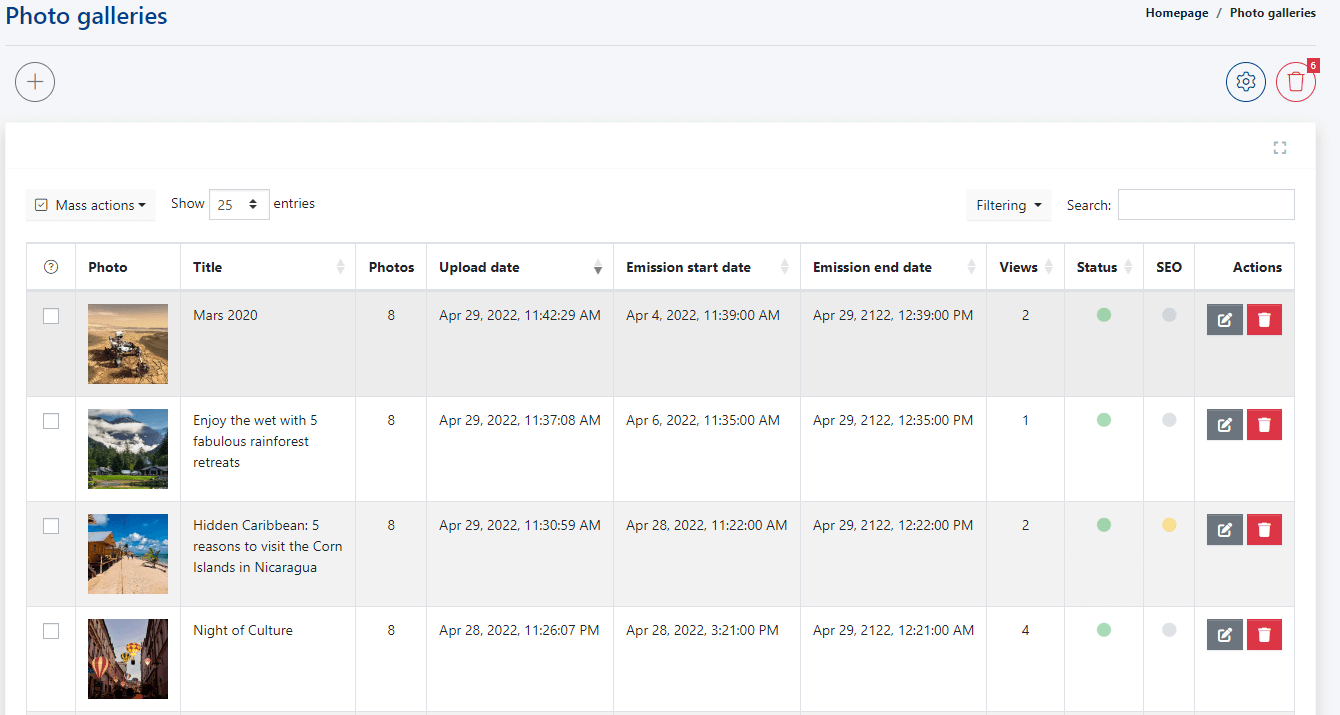
In the columns on the list of added galleries, you will find information about:
- Photo - if you have added a main image to the gallery, it will be displayed as a thumbnail.
- Title - the gallery's title, which you entered in the "Title" field during creation.
- Photos - the number of photos added to the gallery.
- Upload date - the date and time when the gallery was created.
- Emission start date - the date and time when the gallery started being published on the website (when it was made visible to users).
- Emission end date - the date and time when the gallery stopped being published on the website.
- Views - the number of gallery views, indicating how many times users visited the gallery page.
- Status - a green dot indicates active, a red dot indicates inactive (the gallery is then invisible to users and cannot be displayed in the Photo Galleries widget).
- SEO - an indicator of the level of SEO fields completion.
- Actions - here, you will find buttons for editing the gallery and moving it to the trash (a gallery in the trash can always be restored).
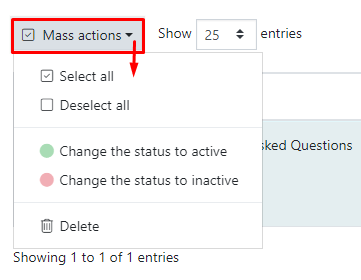
Additionally, thanks to the options for mass operations found on the dropdown list of Mass Actions, you can, for example, select all galleries and change their status from active to inactive, and so on.
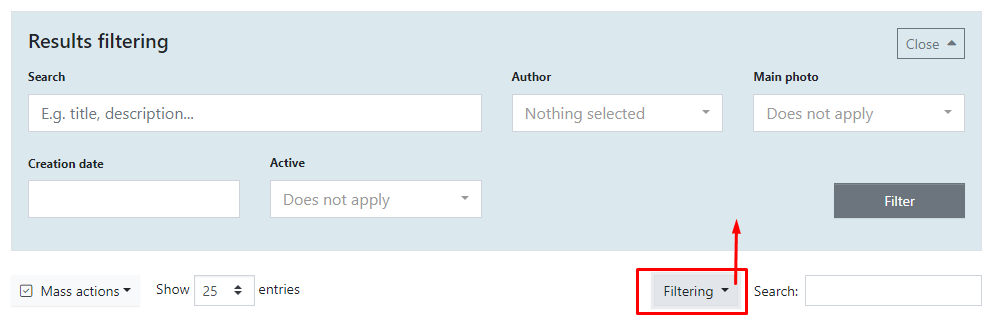
If your website has been operating for a long time and you have added many galleries over the years, you can use the search field or advanced filtering options on the list of photo galleries.
Cascade Gallery - new type of photo gallery
Allows browsing photos by scrolling up and down, without reloading (refreshing) the browser tab. A key advantage of the new gallery is the ability to smoothly display both local and central ads between photos in the gallery. Ads are displayed using a type C ad banner.
How to activate the Cascade Gallery?
A. To activate it in the Photo Galleries module:
- Go to Settings → [Galleries]
- In the [Photo gallery type] field, select [Cascade Gallery]
- Save the changes by clicking the [Save] button

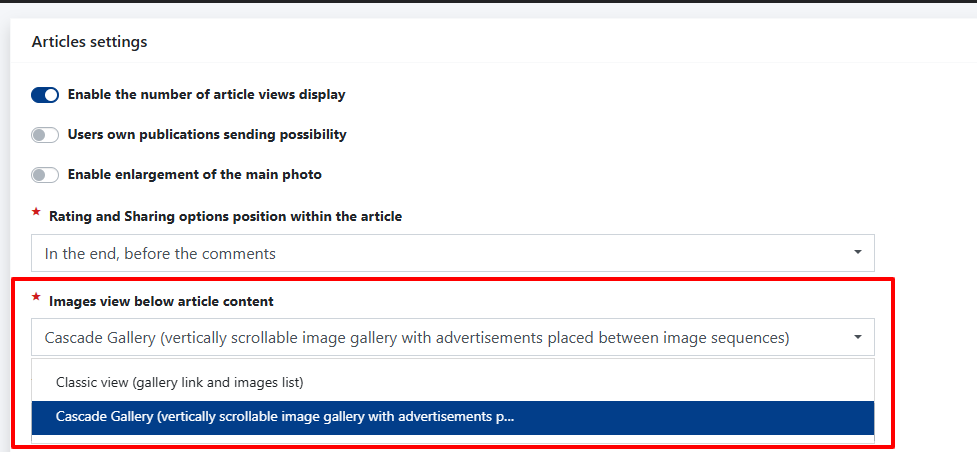
B. To activate for photos displayed in an article (photos uploaded as additional images or a gallery linked to the article):
- Go to Settings → Articles
- In the [Images view below article content] field, select [Cascade Gallery]
- Save the changes by clicking the [Save] button
To activate the widget (or widgets) displaying type C ad banners between photos in the gallery:
- Log in to the Ads4Media platform
- In the [CMS4media Portals] tab, click [Options], then click [Ad Spots]
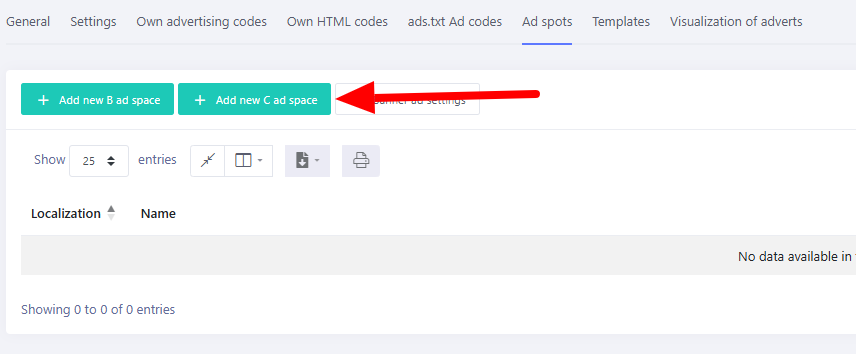
- Click the green [Add new C ad space] button
- Select [Available on the lists, in between the elements]
- From the expanded options, choose the new feature – List of photos in the cascade gallery
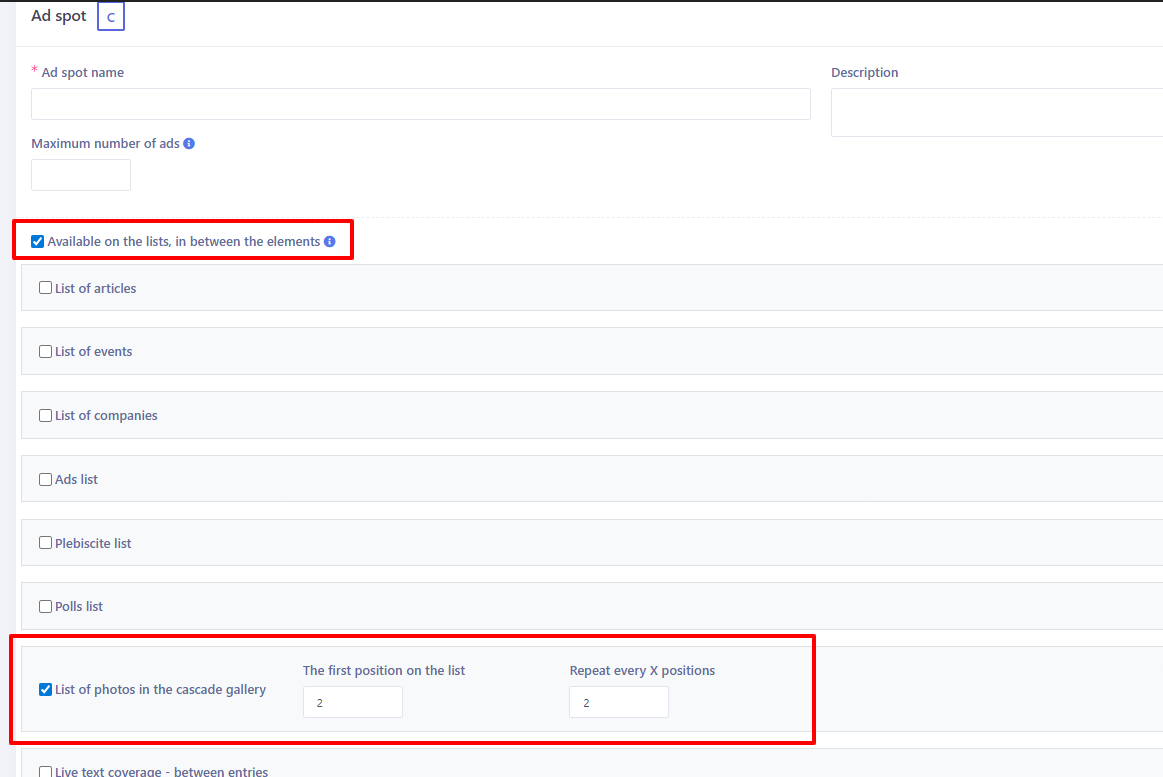
- Specify after how many photos the advertising widget should appear for the first time, and whether it should be displayed again – if so, define after how many photos it should reappear.
In the cascade gallery, a solution has been implemented that allows independent activation of type C widgets displaying central ads, as well as separate widgets for displaying local ads.
Photo Gallery Categorization
Using categories in the [Photo Galleries] module is an optional feature. To implement gallery categorization:
- In the [Categories] → [Photo Galleries] module, add categories (the process for creating a category tree is identical to that used for article categories, etc.)
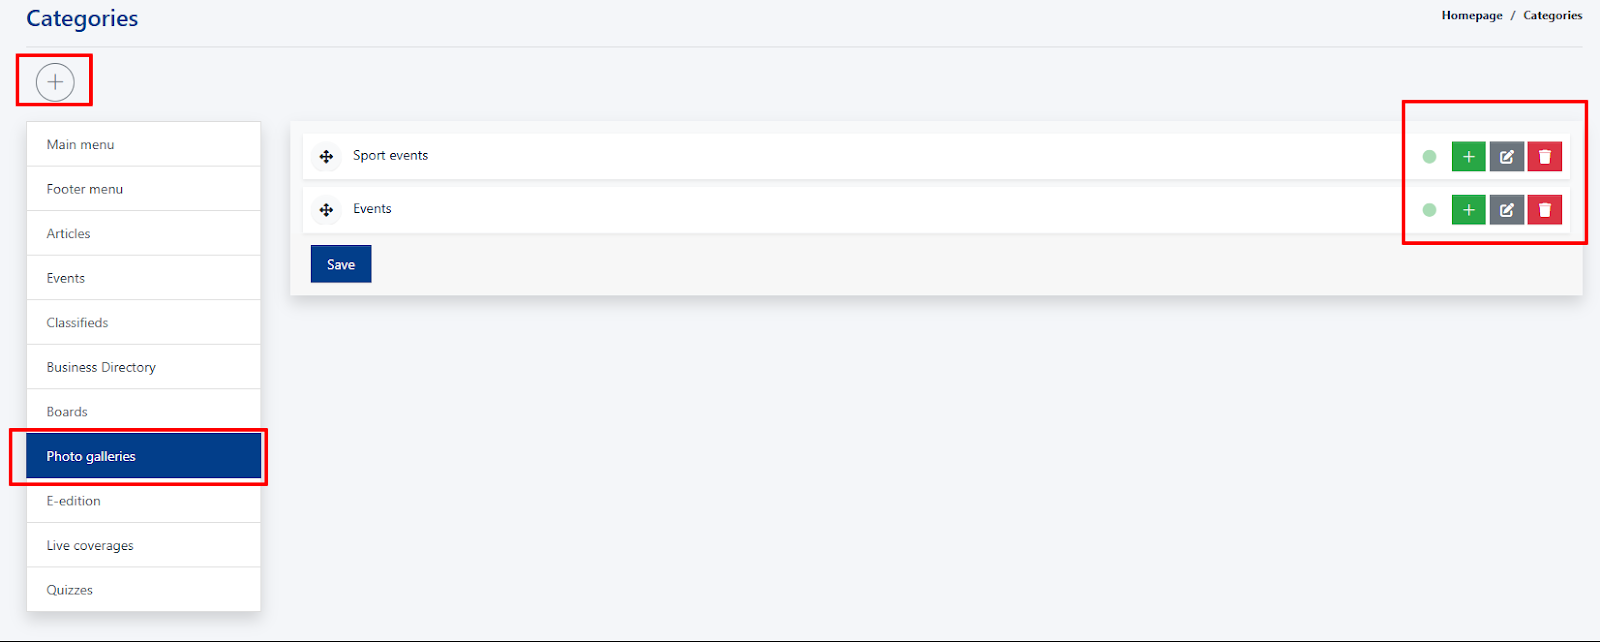
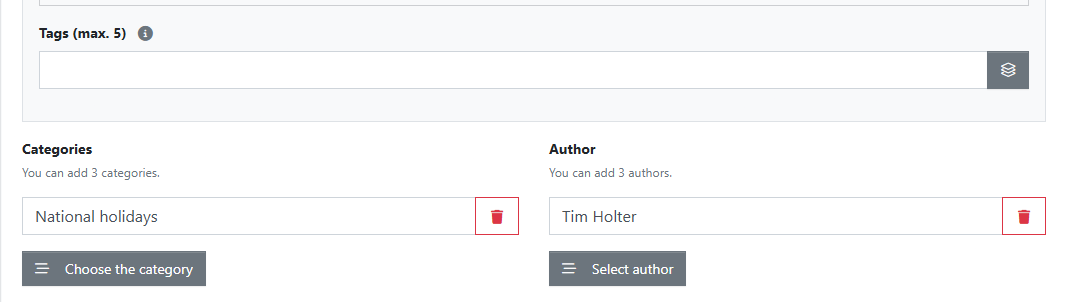
- When creating or editing an existing photo gallery, select at least one thematic category in the form.
Filtering and Sorting within the [Photo Galleries] Module
- With the introduction of categorization, intra-module filtering has been implemented.
Authors in the Photo Galleries Module
Functions are similar to those available in the Articles module, i.e.:
- Selection of a main author and, optionally, additional authors
- Linking the photo gallery to the author’s profile
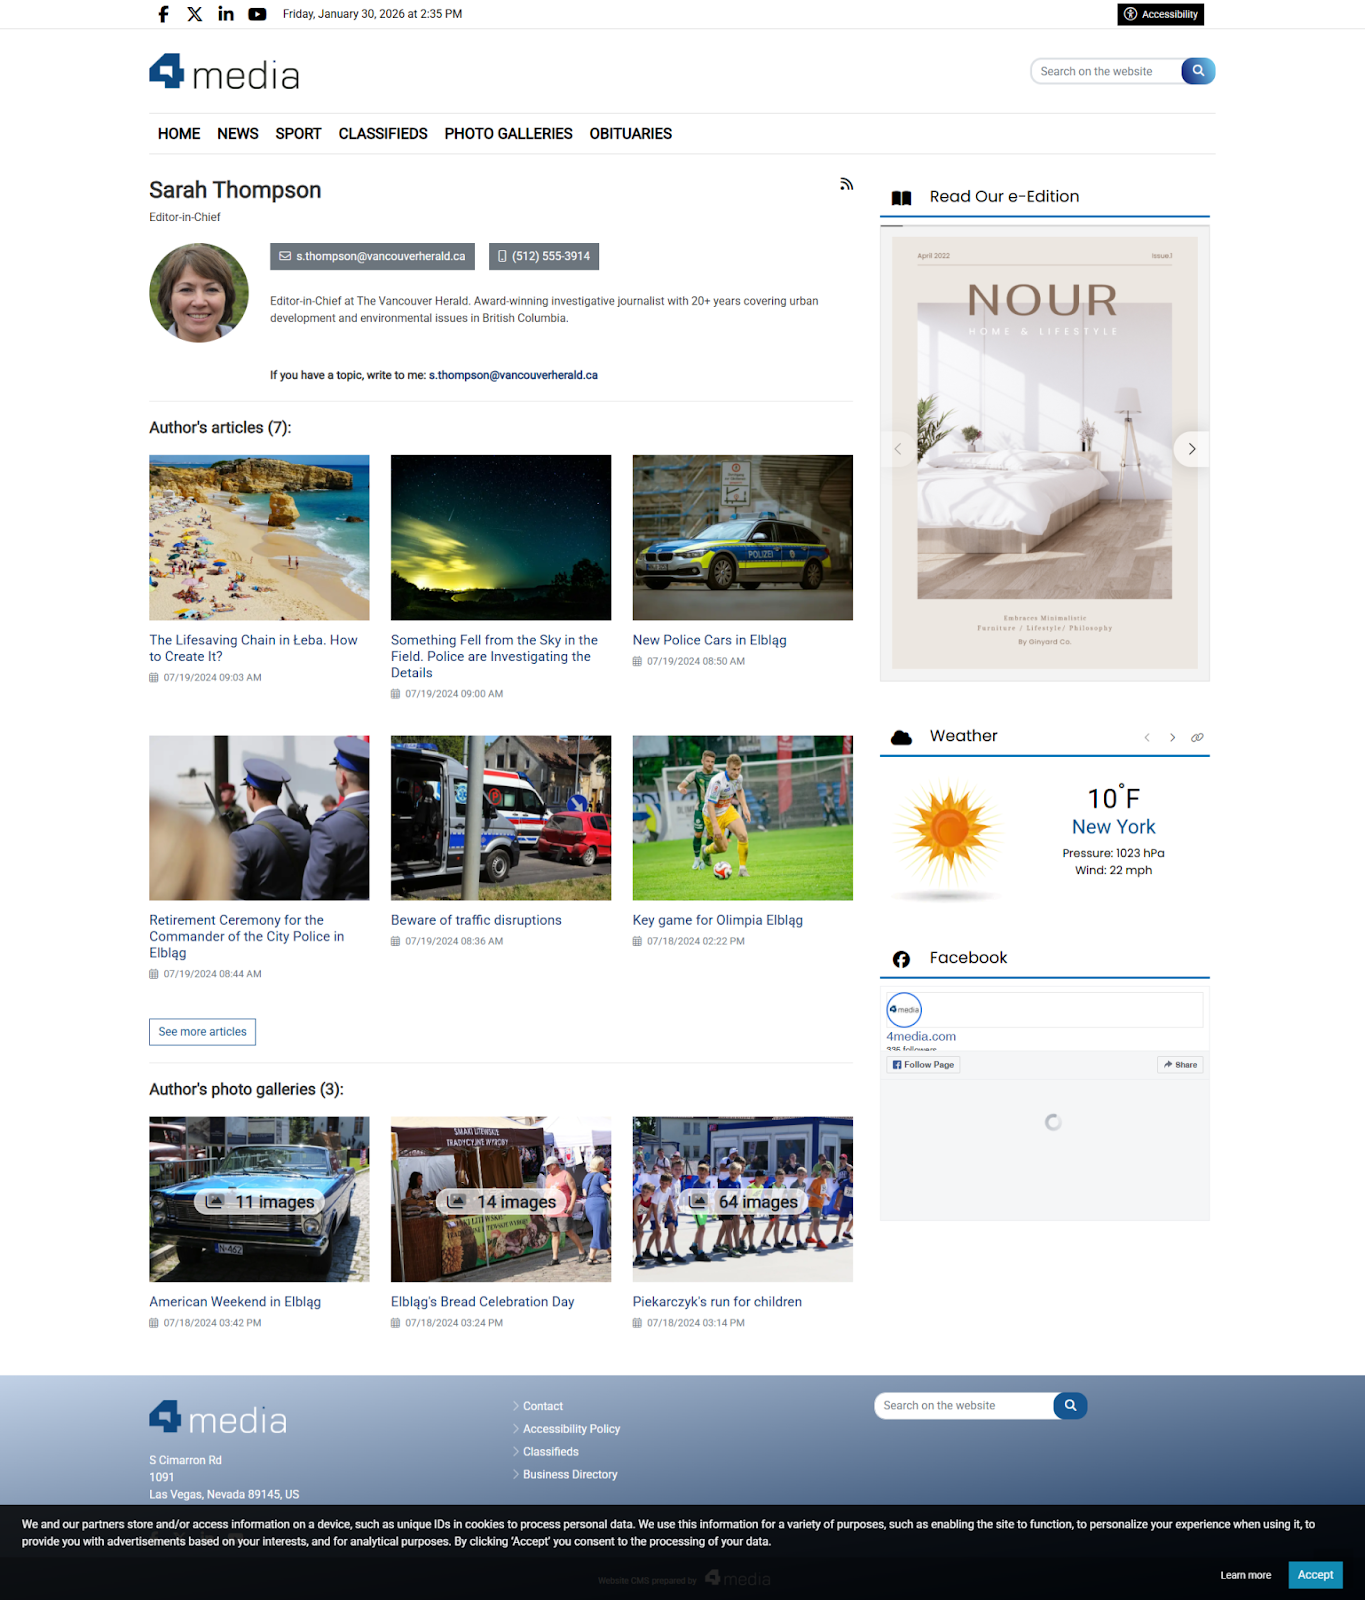
Visual Changes in the Author Tab
With the introduction of linking photo galleries and authors, the author profile has also been expanded – it is now divided into two sections: related articles and photo galleries.
Each section displays the 6 most recent entries, and below them is a button to view the full set of articles or galleries published by a specific author.
Once you have added one or more galleries, you can proceed to configure the widget. See the guide: Photo Galleries Widget.


